Wednesday 27 April 2011

Grungy Messy Fun!

I decided to have a play with some new stamps and dies from Paper Artsy this afternoon. Out came the grunge paper which seemed a must for the flower dies (next time I plan to try metal). Next I selected some distress inks and glimmer mists. Then I set to!

Firstly, I inked the base card (6" x 6") using a couple of colour dusters and crushed olive and tattered rose DIs. Then I over stamped some text (a very useful stamp from Stamp Camp) at the top left and bottom right. I then stamped the images from a new Paper Artsy plate in black versafine ink.

I cut out the flowers and leaves from grungepaper, then set about applying some colour with DIs in crushed olive and peeled paint for the leaves, and tattered rose, victorian velvet and worn lipstick for the flowers. Then I used glimmer mist in cherry blossom on the flowers and sticky fingers liquid lustre in christmas gree on the leaves. Once they were dried I over stamped using the paper artsy stamps and black stazon. I put one flower on top of the other then added a black button (with black thread tied in a knot)  from my stash, and fixed the whole lot to my base card using glue gel.

And what a lovely, messy time I had!

Must dash, spag bol is on the hob and now needs my attention.

Thanks for stopping by. I love to read your comments.

I am entering this card in the following challenge:
Simon Says - Show Some Buttons!

Wanda xxx

Rainbow Lady's Challenge #149 "Sweet Treats for Easter"

Rainbow Lady's Challenge #149 - Sweet Treats for Easter"
I am coming in just under the wire with this one! I just don't know where my week has gone. I was determined to start joining in again.

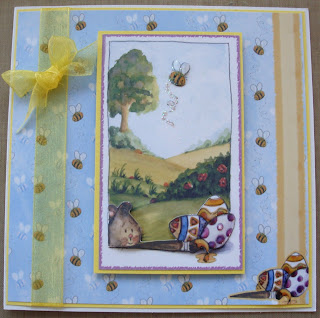
Anyway, onto the card. I have used the Messy Rabbit CD for my main image and backing paper, printed onto text & graphics 160gsm. I have edged the main image with a lavender brilliance ink pad.

The yellow ribbon is from my stash. I have decoupaged parts of the main image, including the little buzzy bee, then I have used irridescent glitter to highlight the curly trail behind the bee. Lastly, I have used glossy accents to highlight the decoration on the eggs.

A quick card and explanation but it made me use a CD and that can't be bad!

Thanks for stopping by. Your comments are always greatly appreciated.

Wanda xxx

Dragon's Dream TIO #76 - Something with a Pocket

 With a butterfly?

Or without a butterfly?

TIO #76 - Something with a Pocket
My sample for my second week on the design team for Frankie's fantastic challenge blog. Elizabeth set the challenge this week for "Something with a Pocket". I knew straight away what she would be doing. As it just so happens I attended a super weekend retreat with her at Paddy's recently, and we were doing needle felting, which we all fell in love with. And as part of our pieces there, we were making a pocket with needle felting! So I decided instead to use a nestie for my pocket.

I couldn't decide whether the butterfly was out of place or not. It probably is, isn't it?

Anyway, my tag is made using a piece of double sided backing paper. For the life of me I can't remember where it is from though. I used a stamp plate by the talented Sam Poole who designs for Creative Expressions. It is the Art plate and has some fantastic splodges and drips on it. I used a few DI's for the paint colours. I inked up the art definition words from the same plate with old paper DI and stamped it all over the background. I then inked around the edges with old paper, then just at the very edges with vintage photo DIs. I added faux stitching around the tag, which I decided belatedly decided should be in the shape of an apron, and also around the pocket. Then I put paint brushes, courtesy of the same stamp plate, into the pocket. I inked the red ribbon with DI, aged mahagony, to try and make it tie in and added it as the ties on the apron. At the last minute I decided to add a little glittered butterfly, or should I? So I photographed it both with and without to see what you think.

Thanks for stopping by. Your comments are always greatly appreciated. And do pop over and check out the fabulous entries from my fellow design team members.

Bye for now.
Wanda xxx

Friday 22 April 2011

Pictures of my Garden

As I can't do much in the way of crafting at the moment as I have injured my back, I though I would show you a few views of my back garden. The main reason for taking pictures in the first place is the magnolia is in bloom as we have never had so many flowers on it before. So the picture below shows the magnolia with our little summer house in the background.


The second photo is a closer look at the summer house. In need of a lick of paint I think! The third photo is a view od one corner of the garden with the garage at the rear.

I'm feeling really frustrated at the moment as I just can't get comfortable to do anything. If I sit for too long I seize up, so I can't sit and read a book. I do hope it improves soon.

I have been making slow progress with my wall hanging, but I will get there in the end. I have been practising using my sewing machine - a Christmas present in 2004 that has hardly seen the light of day so far. Anyway, I am impressed with what it can do, and I haven't even tried changing the feet yet. Think I will try a bit more needle felting just now.

Bye for now. I will try and get a crafty post done soon.
Wanda

Wednesday 20 April 2011

TIO #75 - Birds

TIO # 75 - Birds

The theme this week over on Dragon's Dream TIO challenge is "birds, as you will" and I am delighted to be on the "Dream Team" for Frankie along with some very talented crafters. So make sure you check out their blogs.

I have started with a cream blank tag over which I have placed a crafters workshop mask through which I have stippled mustard seed DI. I have them put the tag through my trusty cuttlebug with a creative expressions embossing folder. I have then lightly brushed over the raised design with tumbled glass DI then applied a pale blue mica powder while the ink was still wet. I don't know if you can catch the shimmer, but it looks lovely irl.

I then cut a piece of acetate the same size as my tag and stamped a selection of penny black and lavinia stamps over it. Finally, using my new paper artsy stamps and dies, I stamped and cut out the cage and bird onto grunge paper and coloured them with the same DIs.  The sentiment is also from paper artsy. Lastly, I have added a blue feather and ribbon, ricrac and fibres from my stash.

Thanks for stopping bye. As always, I appreciate your comments. Please do check out the inspiration from my fellow Dream Team friends and then post your entry over on the Dragon's Dream TIO challenge blog.

Wanda. xxx

Monday 18 April 2011

TIO #74 A Tag by any other Shape

TIO #74 - A Tag by any other Shape
A little late this week I know, but I have been away for the weekend crafting with Paddy. And what a fantastic weekend it was. Two action packed days, learning new techniques. I have now fallen in love with needle felting. It is a bit like peanuts, you just can't stop once you have started. My creation isn't quite finished. I wanted to do a bit more work on it at home. I finished my felting for a pocket today. Next is to embellish the wall hanging. Hopefully, it will be on here in a few days. We did fabric painting, including a lovely resist technique, metal work, bead making using polymer clay (really like that too), a little bit of embroidery, applique if you so desired, or fabic decoupage, and of course, felting. I'm really pleased with how my creation is taking shape.
Anyway, back to this weeks tag. A little rushed as I felt I must get it done today, rather than leaving it until tomorrow morning. You never know what might get in the way.
I have used a nestie shape for my tag. I left it in the die while I inked it up with wild honey DI. I then stamped over with text using the same DI. I then stamped the buttefly by Elusive Images, and the quote, using black archival ink. I then stamped the butterfly again onto another piece of card, and coloured this one with copic markers. I added a little crystal glitter to the "eyes" in the wings. It was difficult to stop the glitter from sticking to the coloured areas, so don't look too closely!
Bye for now. Thanks for stopping by. Comments always welcome.
Wanda.

Sunday 3 April 2011

TIO challenge no 74 - Tag it on the side with paint & paper

Dragon's Dream TIO challenge #74 TIO on the Side with Paint and Paper A chance to get messy and inky with this challenge - lovely. I didn't know where this one was going when I started. I just decided to do the crackle technique with my Eco acrylic paints as a start. Then I decided to use the big flower I made ages ago with gold tissue paper, and rose made by swirling ribbon around (the ribbon waas wrapped around a box of chocolates). Added a swirl courtesy of a Sir Tim die, a sentiment from a stamp plate from Graphicus (now Chocolate Baroque), a glass centred brad from my stash, and lastly, the ribbons to finish, a recent purchase from the NEC. Great fun to make. Please feel free to leave a comment. Bye for now. Wanda

A Little Night Music


This is the challenge this week over at Rainbow Lady's challenge blog. This stamp from a set my The Stamp Man immediately came to mind, as did the film title. So I set to with stamps, inkpads and brayer, and a background stamps, to put my idea onto card, so to speak. The sentiment is from the same sheet of stamps from The Stamp Man, I can't remember where the harlequin background stamp is from. It is one I have had for ages. The inks are adirondak dye ink pads. The border was made using a MS punch and the ribbon is from my stash. The backing paper is from Graphicus (now Chocolate Baroque). Sorry the picture is a bit squiffy!


Bye for now. Comments always welcome.

Wanda